The Moment the Team Realised Marble Specs Matter More Than the Mood Board
“Can we keep the look exactly like the render—and still avoid cracking, lippage, and endless maintenance calls?”
The architect asked it in the most polite way possible. The contractor answered with a sigh. And the stone shop quietly pulled out a notebook—because in real projects, High-End Marble success is rarely about “which color.” It’s about thickness, size, support conditions, finish, and installation logic working together as one system.
This practical guide is built for specifiers who want fewer surprises on site. It explains how to match High-End Marble thickness and slab sizing to different scenarios—floors, walls, stairs, wet zones, and large-format feature areas—using engineering logic, field-proven details, and project-style decision rules aligned with icestone’s supply experience. If you’re reviewing options, starting from the icestone catalog is a smart way to anchor the discussion around consistent supply and project-ready selections.

High-End Marble
Why Thickness and Size Decide Whether High-End Marble “Behaves”
High-end projects push marble harder than people admit. Bigger spaces mean bigger visual expectations—large formats, fewer joints, bookmatching, clean lines. But larger pieces also amplify risk: bending, edge chipping, uneven substrate telegraphing, and installation tolerances turning into visible defects.
From a performance standpoint, marble slabs in service face four common forces:
-
Bending stress from spans, voids, or imperfect bedding
-
Impact from trolleys, dropped objects, and maintenance equipment
-
Shear at edges where nosings, corners, and cutouts concentrate stress
-
Thermal and moisture movement across different substrates and climates
Industry testing (often referenced in stone specification practice via ASTM/EN methods) consistently shows the same pattern: as you increase slab size, the system becomes more sensitive to thickness, support spacing, and workmanship. That’s why most premium specs start by selecting stone families and formats from a controlled source of marble slabs, then adapt thickness and module size to the scenario—not the other way around.
A Practical Spec Rule: Start With Scenario, Not With “Standard Thickness”
In high-end work, “standard thickness” is often a trap. A 20 mm slab might be perfect on a fully supported wall, but high-risk on a large-format floor above underlayment that isn’t perfectly flat. Similarly, 30 mm might be overkill in one area and still insufficient for a cantilevered tread if detailing is wrong.
Use this quick scenario-first approach:
-
Define the use case (floor, wall, stair, wet zone, feature panel).
-
Identify the support condition (full-bed, mechanical anchoring, framed, cantilever).
-
Confirm traffic and impact level (residential vs hospitality vs public).
-
Choose format (tile module vs large-format vs slab cladding).
-
Select thickness that keeps the system stable with real-world tolerances.
If you want this logic applied to your own drawings, the fastest path is to contact icestone with scenario details (area, intended format, substrate type, and traffic level). You’ll save time by aligning feasibility early—before shop drawings lock in risky dimensions.
Thickness and Size Guidance by Scenario
Luxury Floors: The “Quiet Failure Zone”
Floors fail quietly. Not with dramatic breaks, but with hairline cracks, edge chips, hollow spots, and lippage that makes a space feel cheap.
Recommended direction (common project practice):
-
20 mm: safer for smaller formats with excellent substrate and full bedding
-
30 mm: stronger for heavier traffic zones and larger formats where bending risk rises
-
40 mm+ (or laminated build-ups): used where visual mass is required or edges are exposed
Size adaptation principles:
-
Larger formats reduce grout joints (more luxurious) but demand better flatness.
-
Smaller modules tolerate substrate variation better, but can look busier.
-
For high-traffic lobbies, reduce risk by keeping long sides and thin sections away from stress points like entrances and turning paths.
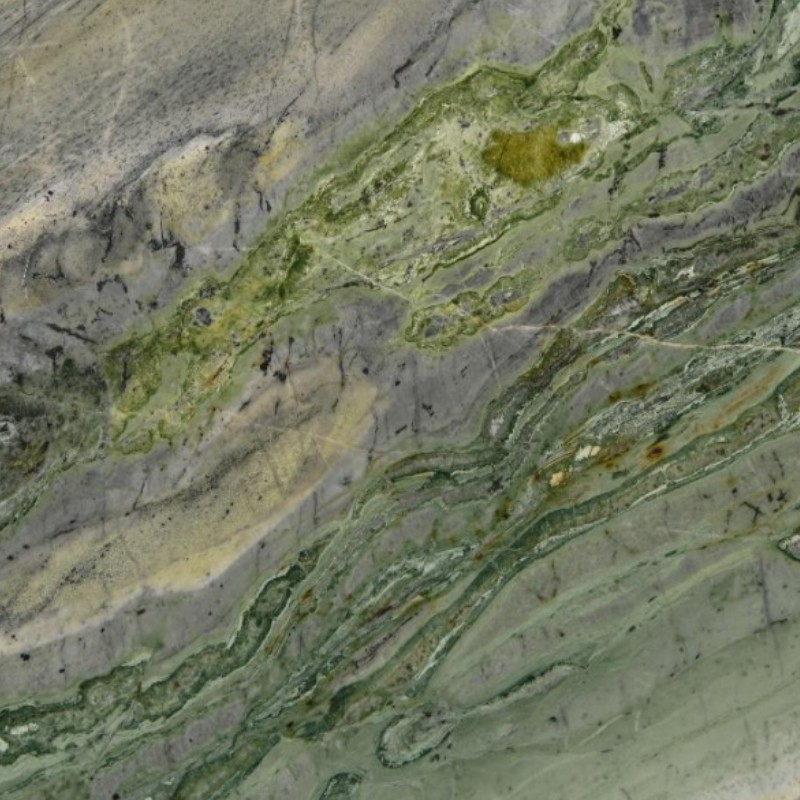
A good example of where size and thickness must be treated seriously is bold, character-driven stone used as a feature floor or transition zone. With a distinctive material like Antique Green Marble, you typically want calmer module planning: fewer awkward cuts at door lines, careful vein direction control, and thickness chosen based on the substrate and anticipated traffic—so the dramatic look stays refined instead of becoming a maintenance problem.
Walls and Vertical Cladding: Bigger Can Be Safer—If Anchored Correctly
Walls often allow larger sizes because they are not bearing the same dynamic loads as floors. But height introduces different risks: anchoring, wind load, differential movement, and vibration.
Recommended direction:
-
18–20 mm: common for interior wall cladding when fully supported or properly anchored
-
20–30 mm: used for large panels, high-impact areas, and situations requiring higher rigidity
-
Use mechanical anchoring where panels are large, tall, or located in circulation routes
Size adaptation principles:
-
Large wall panels can look ultra-premium if the anchor design is correct.
-
For bookmatched features, plan panel geometry around natural block yield to avoid forced patchwork.
-
Confirm tolerances: walls reveal irregularities fast under strong lighting.
Wet Zones: Bathrooms, Spas, Pool-Adjacent Areas
Here the enemy is not only load—it’s chemistry and moisture cycling. Etching and slip risk can ruin a luxury space faster than almost anything.
Recommended direction:
-
Prefer honed/leathered finishes over highly polished for wet floors
-
Use sizes that minimize cut complexity at drains and slopes
-
Thickness should prioritize rigidity if the substrate includes slopes or transitions
Design inspiration matters here because wet-zone marble must look calm while performing reliably. If you’re building the concept board, icestone’s green marble flooring ideas can help you frame finishes and layout approaches that suit both modern and traditional styles—while still respecting real-world maintenance and safety needs.

Ice Connect Marble Bathroom
A Buyer-Ready Comparison Table for Spec Decisions
| Scenario | Typical Risk | Thickness Direction | Size Direction | Key Detail That Prevents Failure |
|---|---|---|---|---|
| Hotel lobby floor | impact + traffic + cleaning | 20–30 mm (often 30 mm for large formats) | medium-to-large formats with strict flatness | control substrate flatness + full bedding |
| Villa living floor | visual perfection + sunlight | 20–30 mm | larger formats possible | plan movement joints + avoid thin edge cuts |
| Bathroom floor | slip + moisture + cleaners | 20–30 mm | sizes that suit slope/drain geometry | non-polished finish + correct sealing |
| Interior wall cladding | anchor safety + movement | 18–30 mm | large panels feasible | engineered anchoring + tolerance planning |
| Stair treads | edge stress + impact | 30 mm+ or engineered build-ups | moderate sizes with safe nosing design | support at nosing + edge reinforcement |
Case Logic: Why Some “Perfect Slabs” Still Fail on Site
Most failures are not caused by “bad marble.” They’re caused by a mismatch between marble dimensions and real installation conditions.
Common failure patterns in high-end work:
-
Too large + too thin over a substrate that isn’t truly flat
-
Long narrow pieces placed where stress concentrates (turning paths, thresholds)
-
Aggressive cleaning chemicals used on polished finishes, creating uneven slip behavior
-
Overconfident detailing at edges, steps, and nosings without reinforcement logic
This is exactly why identification and sourcing discipline matters too. Before you even finalize thickness and module size, confirm you’re working with consistent supply and correct material identity. If you’re evaluating premium marble lines and authorization, icestone’s guide on exclusive agent marble identification helps buyers reduce risk from “looks similar” substitutes that may not match the expected performance or consistency.
As a light industry note, ESTA-style training and trade commentary continues to praise stone projects that treat marble as a system (material + substrate + finish + maintenance plan), not a decorative surface. That mindset is why some luxury floors still look calm ten years later—and others become a patchwork of repairs.
A Specification Checklist You Can Use Before Sign-Off
Use this list to keep the decision grounded:
-
Confirm scenario and traffic level (hotel lobby ≠ private bedroom).
-
Select finish based on use (polished beauty vs safety + maintenance reality).
-
Match size to substrate quality and installer capability.
-
Choose thickness based on spans, edges, and tolerance risk.
-
Plan movement joints and transitions early.
-
Require batch consistency review for highly visual areas (mock layout).
-
Define cleaning and sealing protocol in handover documents.

marble floor manufacturers
FAQ: High-End Marble Thickness and Size Selection
1) What marble thickness is best for luxury flooring?
For many premium interiors, 20–30 mm is common, with 30 mm often preferred in higher-traffic areas or larger-format layouts where bending and edge risk increase.
2) Is large-format marble always better for high-end projects?
Visually, large-format can look more “quiet luxury,” but it demands higher substrate flatness and better workmanship. If those conditions aren’t guaranteed, a slightly smaller module often performs better long-term.
3) Can I use 20 mm marble on stairs?
Stairs concentrate stress at nosings and edges. Many projects use thicker sections or engineered solutions, especially for public or hospitality stairs.
4) What finish is safest for wet areas without losing the luxury look?
Honed, leathered, or lightly textured finishes usually balance slip resistance and elegance better than high polish in wet zones.
5) How do I reduce cracking risk on high-end marble floors?
The fastest wins are: improve substrate flatness, ensure full bedding, avoid thin long cuts in stress zones, and match thickness to traffic + format.
The Most Expensive Mistake Is Choosing Specs Like a “Catalog Item”
A true High-End Marble project doesn’t succeed because the slab is beautiful. It succeeds because thickness, size, finish, substrate, and maintenance reality are aligned from the start.
If you want a floor that stays calm under traffic, a wall that stays safe under lighting and movement, and wet zones that don’t become slip-and-etch nightmares, your specification must be scenario-driven. Treat marble as engineered architecture—not decoration—and you’ll get outcomes that still look intentional years after handover.
And if you’re building a spec package right now, use icestone’s resources as a closed loop: start with product selection, validate identity, confirm feasibility, then finalize thickness and size with real-world installation conditions in mind.
Treat high-end marble as an engineered system, not a decorative finish. Start with the scenario—traffic level, wet exposure, support condition, and module layout—then choose slab size and thickness that remain stable under real-world tolerances. Large formats can look premium, but only if substrate flatness, bedding quality, and movement planning are controlled. In wet zones, select finishes that balance elegance with slip resistance and avoid chemistry-driven surface damage. Before sign-off, confirm batch consistency, edge detailing at thresholds and nosings, and a clear maintenance plan. When thickness and size are chosen for the job they must do, marble stays calm, safe, and presentable long after the opening photos.